
All Mizu products have been engineered to insure the maximum amount of performance and reliability using only the highest grade of materials and backed by Mizu's unparallel lifetime warranty revolutionizing automotive cooling products.
Popular Posts
-
Okay guys/gals I will be documenting the install of the Mizu aluminum radiator, fans, and shroud setup. I will be getting before and after d...
-
Tools Required 8mm socket or wrench 10mm socket or wrench 12mm socket or wrench 4mm hex head wrench Hose clamp or slip joint pliers Wire cu...
-
 Here is my write up for the installation of the Mizu Cooling System provided to me by Sparkplugs.com. It is for use in 5th Generation Prelud...
 -
I got the opportunity to review the http://www.mymizu.com/ Mizu Cooling Solutions radiator, cooling fans and silicone hoses. My car was ...
-
Test Car: 2006 Sentra SE-R Spec V, 70,218 miles, no other cooling system mods. **If anyone buys this setup, and has any questions or comment...
-
I got the MIZU aluminum rad, MIZU silicon rad hoses and MIZU dual rad fans W/shroud from... http://www.sparkplugs.com/ Unfortunately th...
-
Sporting the latest advancements in cooling technology, Mizu Cooling Solutions offers excellent radiator upgrades. Handmade and hand-welded,...
-
So I'm driving home from dinner around 8 o'clock at night when I stop at a red light and steam starts flowing out f...


Wednesday, August 3, 2011
Mizu Cooling Solutions
Sporting the latest advancements in cooling technology, Mizu Cooling Solutions offers excellent radiator upgrades. Handmade and hand-welded, Mizu radiators employ the highest-quality aluminum available and direct OEM (original equipment manufacturer) fitment. Prominent design features include three cooling rows rather than the standard one row, supplemental thickness in the core and increased fin density, and a high-pressure 1.3-bar Mizu radiator cap. After each radiator is fully completed, the professionals at Mizu Cooling Solutions subject the product to various tests to ensure quality and reliability. Engineered to hold up against even the most strenuous conditions, Mizu radiators fully satisfy the demands of professional racers. Other products manufactured by Mizu Cooling Solutions include silicon hoses, aluminum fan shrouds, fans, and thermostats. An effective cooling system is necessary for an engine to operate without overheating. With the high-performance products by Mizu Cooling Solutions, automobile engines perform with optimal efficiency. Mizu Cooling Systems offers the Mizu Lifetime Warranty for all products. Professional organizations affiliated with Mizu Cooling Systems include the Specialty Equipment Market Association and Pro-Motion Distributing.
Thursday, July 7, 2011
Mizu Radiator & Fan Install and Review (02-06 Spec V)
Test Car: 2006 Sentra SE-R Spec V, 70,218 miles, no other cooling system mods.
**If anyone buys this setup, and has any questions or comments on the install, feel free to post in this thread and I'll try my best to answer them**
Pros: Very high quality, beautiful welds, good fitment, excellent performance, whole assembly has a quality feel to it. Very nice addition to any build, for both looks and performance.
Cons: Very few, the only thing I didn't like was how tight the drain plug has to be, but it could have just been a grommet out of place. Needs 2 bolts that are not included with the kit, stock ones are not usable in that area (I touch on this on the install.) Wiring connections to the fans need to be modified, but that is addressed here, and is easy to figure out even without these instructions.
I have a wiring diagram on the way, and had one made up, but I completely reversed my colors, so look for an update this weekend.
I've noticed since the install, the fans come on less often, indicating that the radiator is more efficient than stock. I have my before printouts from the Consult II, just need to get my "after" readings for exact numbers. The radiator and fan assembly fit very well, and make no noise over bumps.
Install:
Tools Needed:
10mm Socket
Wire Cutters
Screwdriver or Clip Remover
Hose Clamp Pliers
Funnel
2 10x6Mx20 bolts, a little shorter is fine.
1 gallon of coolant, buy concentrate, no need to pay for water.
1 Bucket or drain pan with capacity to catch your entire cooling system contents.
Removing your stock radiator and fan assembly:
1. Make sure your car is cool, and slowly remove your factory radiator cap.
2. Drain coolant using the drain at the bottom drivers side of the radiator. (Remove the plastic trim piece under it, it will save some coolant cleanup)
")
")
3. While coolant is draining, remove the 2 radiator mounting brackets at the top. Be careful, the coolant overflow bottle is attached to the passenger side radiator mount, un-clip the overflow hose.
")
4. Now is a good time to check out your upper radiator bushings for cracks and wear. If you see that the bushings are worn, you should go ahead and replace them, they're a few bucks from your Nissan Dealer. You can continue with your install even if the bushings are bad, they can be replaced later. If you're reading this ahead of time, order the lower radiator bushings as well, they just pop in.
5. Remove your coolant overflow bottle (1 10mm bolt) and tilt it up to fully drain it (this will prevent a mess later, and also ensures your system will be filled with new coolant)
")
6. Remove over flow hose from where it connects to the radiator fill neck (next to where the cap goes) and set it aside.
7. Using hose clamp pliers, remove the upper radiator hose clamp, then remove the upper radiator hose and tuck it back out of the way. Again, this is a good time to check your radiator hose for cracks and dry rotting. If you see anything suspicious, replace the hose, it's only going to cause problems later. It's also a good idea to replace your clamps.
")
")
8. Repeat process for lower radiator hose. There may still be a little bit of coolant in the bottom of the radiator, even with the drain open, so be careful when pulling the lower hose.
")
9. Remove all electrical connectors (2) from your fan assembly. Also make sure you remove their retaining clips which hold the fan power wires to the fan itself, there will be a few, make sure you get them all or your fans will not come out.
")
10. Remove the 2 10mm bolts holding your fan assembly to your radiator. (Set these aside, they will NOT be re-used)
")
Your fan and radiator should now be completely free from your car.
11. Carefully remove the fan assembly, don't try to remove the radiator and fan as one piece, you risk damaging your air conditioning system. (Tip: Slightly lift the passenger side of the fan higher than the drivers side, that's the way it needs to come out, the underhood fuse box is in the way on the drivers side). Make sure your lower radiator bushings are still in the car where the bottom of the radiator was, not stuck to the bottom of your old radiator.
12. Remove your radiator, this is how it should look:
")
13. Remove your Mizu Radiator and Fan Assembly from their boxes.
")
14. Assemble the radiator and fans together as shown, DO NOT USE THE FACTORY BOLTS HERE, THEY WILL DAMAGE THE RADIATOR. Use 10x6Mx20 Bolt (the same ones that hold in the brackets you removed with your radiator bushings in them)
")
15. Although you removed your stock radiator and fan separtaely, the Mizu assembly can be installed as one unit. (Tip: Facing the car when installing, install at an angle so that the drivers side goes in first, so it can slide under the fuse box.)
Also, check to make sure that all of the bolts holding the fan covers to it's metal frame are tight, do not over tighten, it will dimple the metal.
")
The Radiator and Fan assembly should fit in the car exactly like the stock one.
16. Re-connect upper and lower radiator hoses, and re install your upper radiator support brackets.
17. Your cooling fan plugs should look like this, when held with the clip facing upwards, the top 2 wires are power, the bottom 2 are ground.
")
18. Cut the top 2 wires from your factory harness, splice them together, and connect to the blue wires coming from the Mizu fans. Then, cut the 2 bottom wires from the factory harness, splice them together, then attach them to the black wire coming from the Mizu fans. You may have to cut the connectors from the Mizu wires, and use a weatherproof connector, depending on your wire size. Do not try to stuff your spliced wires into the connector, frayed wires have a less solid connection.
")
")
19. Fill up your coolant and resevioir, leave the radiator cap off to bleed your coolant. (Tip: if you're having trouble getting an air bubble out, jack the front of the car up and bleed)
20. Test your wiring before your car even warms up: Unplug your Engine Coolant Temperature Sensor (ECT), both fans should come on, the ECM thinks either it's over heating or has a bad ECT sensor, and turns all fans on to be sure that the engine doesn't overheat. This WILL set a check engine light, but it's an easy way to check to make sure everything is working. Make sure that the fans are blowing TOWARD the engine. Put a post-it note on the back side of the fan shroud, and see which way it blows if you don't feel comfortable sticking your hand between the hot exhaust manifold and spinning fan blades
21. After you've confirmed the fans work and air bubbles stop coming out, re install your radiator cap, secure your wiring (exhaust manifolds will easily melt wires), and take for a quick test drive to ensure your fans come on when they are supposed to, if you have any over heating, restart the bleeding process after the engine has cooled to a safe temperature to remove the radiator cap.
Final Result:
")
This last pic is just showing how much radiators will move with bad radiator bushings, replace them! You don't want your new assembly banging around I was pushing on the radiator, when installed it should be dead center.
")
**If anyone buys this setup, and has any questions or comments on the install, feel free to post in this thread and I'll try my best to answer them**
Pros: Very high quality, beautiful welds, good fitment, excellent performance, whole assembly has a quality feel to it. Very nice addition to any build, for both looks and performance.
Cons: Very few, the only thing I didn't like was how tight the drain plug has to be, but it could have just been a grommet out of place. Needs 2 bolts that are not included with the kit, stock ones are not usable in that area (I touch on this on the install.) Wiring connections to the fans need to be modified, but that is addressed here, and is easy to figure out even without these instructions.
I have a wiring diagram on the way, and had one made up, but I completely reversed my colors, so look for an update this weekend.
I've noticed since the install, the fans come on less often, indicating that the radiator is more efficient than stock. I have my before printouts from the Consult II, just need to get my "after" readings for exact numbers. The radiator and fan assembly fit very well, and make no noise over bumps.
Install:
Tools Needed:
10mm Socket
Wire Cutters
Screwdriver or Clip Remover
Hose Clamp Pliers
Funnel
2 10x6Mx20 bolts, a little shorter is fine.
1 gallon of coolant, buy concentrate, no need to pay for water.
1 Bucket or drain pan with capacity to catch your entire cooling system contents.
Removing your stock radiator and fan assembly:
1. Make sure your car is cool, and slowly remove your factory radiator cap.
2. Drain coolant using the drain at the bottom drivers side of the radiator. (Remove the plastic trim piece under it, it will save some coolant cleanup)
3. While coolant is draining, remove the 2 radiator mounting brackets at the top. Be careful, the coolant overflow bottle is attached to the passenger side radiator mount, un-clip the overflow hose.
4. Now is a good time to check out your upper radiator bushings for cracks and wear. If you see that the bushings are worn, you should go ahead and replace them, they're a few bucks from your Nissan Dealer. You can continue with your install even if the bushings are bad, they can be replaced later. If you're reading this ahead of time, order the lower radiator bushings as well, they just pop in.
5. Remove your coolant overflow bottle (1 10mm bolt) and tilt it up to fully drain it (this will prevent a mess later, and also ensures your system will be filled with new coolant)
6. Remove over flow hose from where it connects to the radiator fill neck (next to where the cap goes) and set it aside.
7. Using hose clamp pliers, remove the upper radiator hose clamp, then remove the upper radiator hose and tuck it back out of the way. Again, this is a good time to check your radiator hose for cracks and dry rotting. If you see anything suspicious, replace the hose, it's only going to cause problems later. It's also a good idea to replace your clamps.
8. Repeat process for lower radiator hose. There may still be a little bit of coolant in the bottom of the radiator, even with the drain open, so be careful when pulling the lower hose.
9. Remove all electrical connectors (2) from your fan assembly. Also make sure you remove their retaining clips which hold the fan power wires to the fan itself, there will be a few, make sure you get them all or your fans will not come out.
10. Remove the 2 10mm bolts holding your fan assembly to your radiator. (Set these aside, they will NOT be re-used)
Your fan and radiator should now be completely free from your car.
11. Carefully remove the fan assembly, don't try to remove the radiator and fan as one piece, you risk damaging your air conditioning system. (Tip: Slightly lift the passenger side of the fan higher than the drivers side, that's the way it needs to come out, the underhood fuse box is in the way on the drivers side). Make sure your lower radiator bushings are still in the car where the bottom of the radiator was, not stuck to the bottom of your old radiator.
12. Remove your radiator, this is how it should look:
13. Remove your Mizu Radiator and Fan Assembly from their boxes.
14. Assemble the radiator and fans together as shown, DO NOT USE THE FACTORY BOLTS HERE, THEY WILL DAMAGE THE RADIATOR. Use 10x6Mx20 Bolt (the same ones that hold in the brackets you removed with your radiator bushings in them)
15. Although you removed your stock radiator and fan separtaely, the Mizu assembly can be installed as one unit. (Tip: Facing the car when installing, install at an angle so that the drivers side goes in first, so it can slide under the fuse box.)
Also, check to make sure that all of the bolts holding the fan covers to it's metal frame are tight, do not over tighten, it will dimple the metal.
The Radiator and Fan assembly should fit in the car exactly like the stock one.
16. Re-connect upper and lower radiator hoses, and re install your upper radiator support brackets.
17. Your cooling fan plugs should look like this, when held with the clip facing upwards, the top 2 wires are power, the bottom 2 are ground.
18. Cut the top 2 wires from your factory harness, splice them together, and connect to the blue wires coming from the Mizu fans. Then, cut the 2 bottom wires from the factory harness, splice them together, then attach them to the black wire coming from the Mizu fans. You may have to cut the connectors from the Mizu wires, and use a weatherproof connector, depending on your wire size. Do not try to stuff your spliced wires into the connector, frayed wires have a less solid connection.
19. Fill up your coolant and resevioir, leave the radiator cap off to bleed your coolant. (Tip: if you're having trouble getting an air bubble out, jack the front of the car up and bleed)
20. Test your wiring before your car even warms up: Unplug your Engine Coolant Temperature Sensor (ECT), both fans should come on, the ECM thinks either it's over heating or has a bad ECT sensor, and turns all fans on to be sure that the engine doesn't overheat. This WILL set a check engine light, but it's an easy way to check to make sure everything is working. Make sure that the fans are blowing TOWARD the engine. Put a post-it note on the back side of the fan shroud, and see which way it blows if you don't feel comfortable sticking your hand between the hot exhaust manifold and spinning fan blades
21. After you've confirmed the fans work and air bubbles stop coming out, re install your radiator cap, secure your wiring (exhaust manifolds will easily melt wires), and take for a quick test drive to ensure your fans come on when they are supposed to, if you have any over heating, restart the bleeding process after the engine has cooled to a safe temperature to remove the radiator cap.
Final Result:
This last pic is just showing how much radiators will move with bad radiator bushings, replace them! You don't want your new assembly banging around
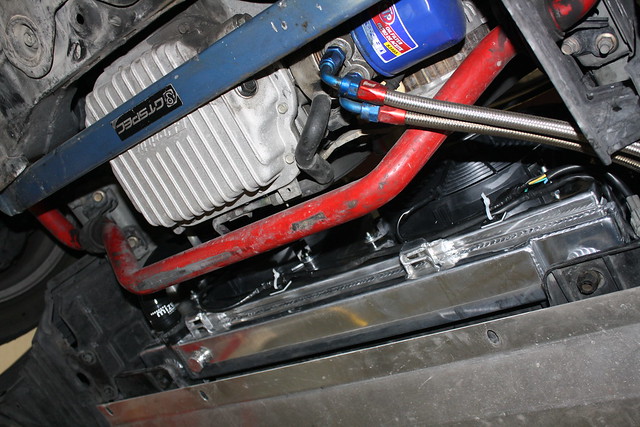
I was pushing on the radiator, when installed it should be dead center.Nissan 350Z Mizu Radiato, Fans, and Hoses Installation
I got the opportunity to review the http://www.mymizu.com/ Mizu Cooling Solutions radiator, cooling fans and silicone hoses. My car was running a Mishimoto radiator for the past 3 years, it is pretty much a knock off of the Koyo 36mm radiator. Old cooling system stripped out, ready for fun.
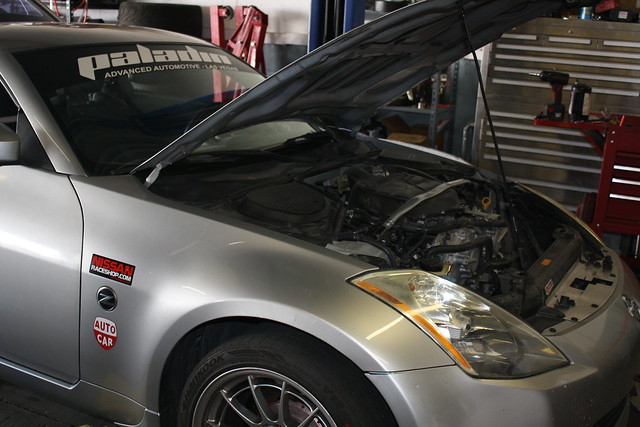
First thing I did when I got down to www.paladinlasvegas.com was unbox the Mizu and get the old radiator out to compare them side by side.
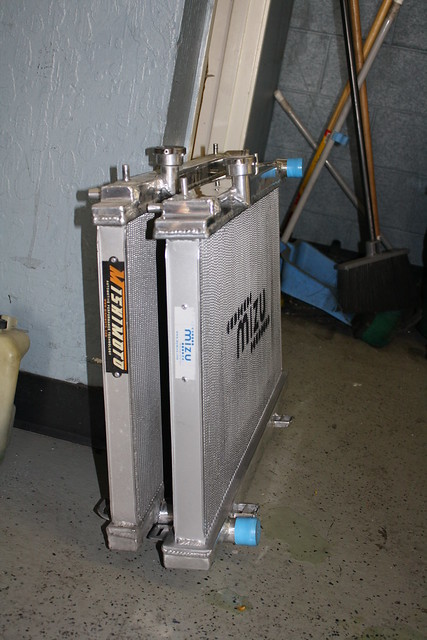
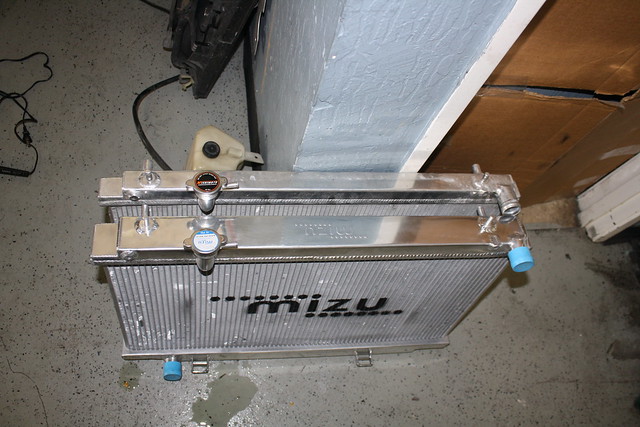
Not easy to see, but the Mishimoto measured out at 37mm while the Mizu measured out at 44mm, but what you can see is the upper and lower tanks are massive on the Mizu. Bigger tanks = more fluid, that added capacity is usually a good thing.
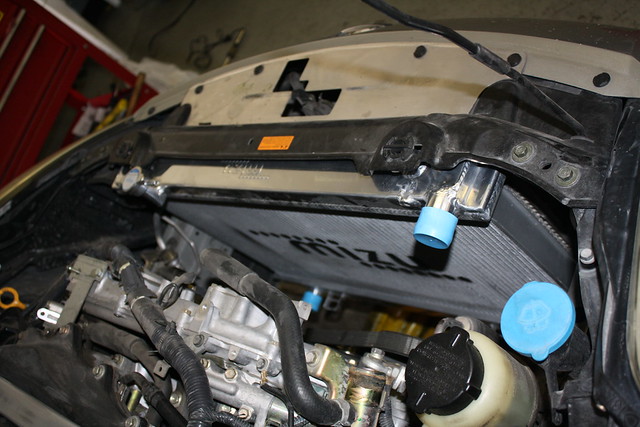
Time to slide it in place, this is where the fun begins. I've installed a couple 36mm Koyo's, the 54mm Koyo, obviously the Mishimoto and its always a fight with the lower AC condensor mounting points. First time, it went right in, also shocking because of the tank size. No cutting of the core support needed (unlike on the 54mm and 56mm cores radiators) and the upper mounting posts were actually in the proper location unlike my prior radiator.
Little tip to make things easier. On the passenger side remove the coolant reservior and the bracket before you slide the radiator in or out of the car. The the AC line bracket on the drivers side on the frame rail right behind the radiotor, unbolt it.
Next it is time to wire up the fans. This the the diagram that I8acobra came up with 4 years ago when we wired up istans car. Pretty crazy, I8acobra now works at Paladin Advanced, same shop we were doing my car at.
http://my350z.com/forum/attachments/...n-wiring-1.jpg
Link to the old thread http://my350z.com/forum/forced-induc...ling-mods.html and http://my350z.com/forum/engine-and-d...an-wiring.html
Fans are all wired up, FYI , when reading the schematic the color of wires is the chassis harness, not the wires after the cannon plugs that connect directly to the factory fans.
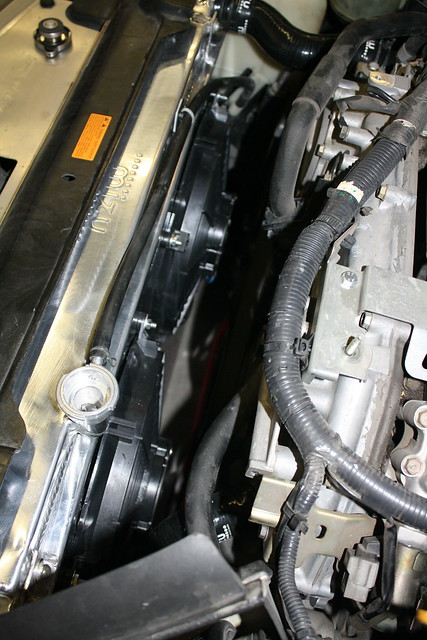
All wired and taped up, a pic from the top. Between the fan shroud and polished radiator, it is pretty. It is also very thin compaired to the stock shroud, very nice to have because of clearance problems on the FI cars. Then the show guys, this just adds some nice bling while pushing a lot more air that stock .
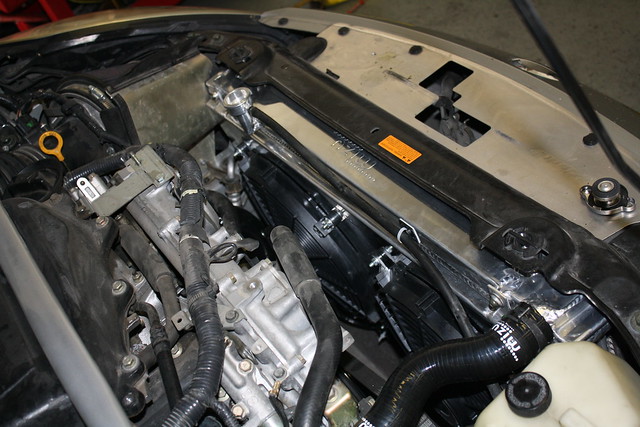
Another view, dam this thing is slim.
Hoses are the 2 piece set, upper and lower. Just like every other hose kit i have installed the upper hose needed some trimming to fit. The hose needs to be shortened roughtly 3/4 to fit without having a kink. Very simple to do, then i used a pocket torch to smooth the cut ends. They still look showquality when finished. Hoses installed and time to fill it up!!!
I really hate the bleeding process. First i tried the vacumm fill, all that did was create air pockets thru the entire cooling system. So I next broke out the spill free funnel
http://www.google.com/products/catal...d=0CCIQ8wIwAA#
So nice to have, i bought one for home use. I still do a lot of the work out of the garage at my condo. While my car was running and waiting for the thermostat to open time to get some work done on the thmotorsports Circuit Battle Subaru STI

Back in the morning to finish this up. Not to mention, way to much to write up in one post. thmotorsports
First thing I did when I got down to www.paladinlasvegas.com was unbox the Mizu and get the old radiator out to compare them side by side.
Not easy to see, but the Mishimoto measured out at 37mm while the Mizu measured out at 44mm, but what you can see is the upper and lower tanks are massive on the Mizu. Bigger tanks = more fluid, that added capacity is usually a good thing.
Time to slide it in place, this is where the fun begins. I've installed a couple 36mm Koyo's, the 54mm Koyo, obviously the Mishimoto and its always a fight with the lower AC condensor mounting points. First time, it went right in, also shocking because of the tank size. No cutting of the core support needed (unlike on the 54mm and 56mm cores radiators) and the upper mounting posts were actually in the proper location unlike my prior radiator.
Little tip to make things easier. On the passenger side remove the coolant reservior and the bracket before you slide the radiator in or out of the car. The the AC line bracket on the drivers side on the frame rail right behind the radiotor, unbolt it.
Next it is time to wire up the fans. This the the diagram that I8acobra came up with 4 years ago when we wired up istans car. Pretty crazy, I8acobra now works at Paladin Advanced, same shop we were doing my car at.
http://my350z.com/forum/attachments/...n-wiring-1.jpg
Link to the old thread http://my350z.com/forum/forced-induc...ling-mods.html and http://my350z.com/forum/engine-and-d...an-wiring.html
Fans are all wired up, FYI , when reading the schematic the color of wires is the chassis harness, not the wires after the cannon plugs that connect directly to the factory fans.
All wired and taped up, a pic from the top. Between the fan shroud and polished radiator, it is pretty. It is also very thin compaired to the stock shroud, very nice to have because of clearance problems on the FI cars. Then the show guys, this just adds some nice bling while pushing a lot more air that stock .
Another view, dam this thing is slim.
Hoses are the 2 piece set, upper and lower. Just like every other hose kit i have installed the upper hose needed some trimming to fit. The hose needs to be shortened roughtly 3/4 to fit without having a kink. Very simple to do, then i used a pocket torch to smooth the cut ends. They still look showquality when finished. Hoses installed and time to fill it up!!!
I really hate the bleeding process. First i tried the vacumm fill, all that did was create air pockets thru the entire cooling system. So I next broke out the spill free funnel
http://www.google.com/products/catal...d=0CCIQ8wIwAA#
So nice to have, i bought one for home use. I still do a lot of the work out of the garage at my condo. While my car was running and waiting for the thermostat to open time to get some work done on the thmotorsports Circuit Battle Subaru STI
Back in the morning to finish this up. Not to mention, way to much to write up in one post. thmotorsports
1996-2004 Mustang Manual Transmission Mizu Radiator and Fan Shroud Install
Tools Required
8mm socket or wrench10mm socket or wrench12mm socket or wrench4mm hex head wrenchHose clamp or slip joint pliersWire cutters/StrippersSoldering Iron with solderHeat-Shrink Wrap
1. Disconnect the vehicle battery using an 8mm wrench or socket.2. Raise the vehicle using ramps or jack up the vehicle and support it on jack stands, ensuring you are on a flat, stable area.3. Drain the existing coolant using the drain petcock located on the passenger’s side lower radiator. Ensure that you properly contain and dispose of used coolant.4. Remove the coolant reservoir by removing the 3-12mm nuts located on the top of the tank and removing the 2 coolant lines attached to the reservoir.
5. Remove the coolant reservoir tank.
6. Remove the radiator cover by pulling the 4 push pins. Some vehicles have push pins with a Phillips screw in the center. In this case, loosen the center retaining screw and then remove the entire cover by lifting gently.

7. Remove the upper and lower radiator hoses from the radiator using hose clamp pliers or slip joint pliers and move them out of the way. Upper radiator hose removed completely in the pictures for clarity, but is not necessary.
8. Unplug the factory wiring harness from the cooling fan. 2001+ vehicles will have an additional sensor shown in this picture. It does not need to be unplugged, it will be removed with the radiator and not used.
9. Remove the upper radiator mounts using a 10mm socket or wrench.
10. Remove the factory radiator and fan together by gently sliding them up and out of the vehicle. Tilting the radiator may be necessary to clear the battery.
11. Prepare your new Mizu radiator for installation by fitting the fan shroud. The fan shroud may require some slight adjusting by bending the brackets to seat properly. Attach the fan shroud to the radiator using a 4mm hex head wrench.
IMPORTANT!!!!
12. Install your Mizu radiator by sliding it into the factory mounts and attaching the factory upper radiator mounts. This vehicle has an ABS delete manifold which had to be relocated to provide adequate clearance. Pictures provided of a factory 1999 Mustang GT ABS pump installed for comparison.


13. Re-Install the upper and lower radiator hoses and the coolant reservoir. All connections are in the factory locations.

14. Cut the factory plug off of your stock fan. It should have 2 or 3 wires depending on the year. If it is a 3 wire connection, we only need the orange and black wire, the red wire can be removed.

15. The cooling fans on the supplied Mizu fans feature bullet-style connectors. These can be used, but the preferred method is to solder and heat-shrink wrap all electrical connections. In the supplied configuration, the fans are designed to operate in the proper configuration, sucking air through the radiator. Attach both black wires from the cooling fans, lengthening as needed to attach to the factory black wire pictured above. Attack both blue wires using the same method to the orange wire pictured above. Solder and shrink-wrap all connections and zip tie them securely out of the way of any moving parts.
16. Check all coolant and electrical connections for proper installation.
17. Fill the radiator using a mix of 50% Antifreeze, 50% Water.
18. Reconnect the battery.
19. Start the vehicle and check for coolant leaks. If none are found, let the vehicle run long enough to reach the high speed fan turn on temperature. Since ours was programmed to 185 degrees, we hooked up to a scan-tool and monitored the ECT (engine coolant temps) closely. Most handheld tuning devices can also be used to monitor ECTs using the Datalog function. Verify that once the high-speed fan temperature is reached both fans turn on and function properly. They should be blowing air towards the engine, not back toward the radiator. If they do not blow towards the engine, reverse the fan wiring and re-check for proper operation.
20. Verify coolant level is still correct. Because of air pockets in the system, it’s advisable to check the coolant level after every drive cycle to ensure the level is still correct.
21. Test drive the vehicle to ensure there’s no overheating, and again, verify the absence of leaks and the proper coolant level.

8mm socket or wrench10mm socket or wrench12mm socket or wrench4mm hex head wrenchHose clamp or slip joint pliersWire cutters/StrippersSoldering Iron with solderHeat-Shrink Wrap
Installation Instructions

5. Remove the coolant reservoir tank.


8. Unplug the factory wiring harness from the cooling fan. 2001+ vehicles will have an additional sensor shown in this picture. It does not need to be unplugged, it will be removed with the radiator and not used.


IMPORTANT!!!!
If your vehicle is equipped with Anti-lock brakes, you must relocate the ABS pump rearwards about 1” at this point. You do this at your own risk, no instructions provided for this task. Pictures will be provided for reference and comparison purposes only.


WARNING:
This wiring process relies on the ECU’s high speed fan turn-on and turn-off temperature to control the Mizu fan’s operation. Low speed fan turn-on settings will no longer function. Depending on your car, you may want to adjust the high speed fan turn on temperature using a hand-held tuner. All adjustments on this car were made using an SCT SF3/X3 and set at 185 degrees. Neither Mizu Cooling Solutions nor SparkPlugs.com assume any responsibility for how you decide to actuate your cooling fans.

16. Check all coolant and electrical connections for proper installation.
17. Fill the radiator using a mix of 50% Antifreeze, 50% Water.
18. Reconnect the battery.
19. Start the vehicle and check for coolant leaks. If none are found, let the vehicle run long enough to reach the high speed fan turn on temperature. Since ours was programmed to 185 degrees, we hooked up to a scan-tool and monitored the ECT (engine coolant temps) closely. Most handheld tuning devices can also be used to monitor ECTs using the Datalog function. Verify that once the high-speed fan temperature is reached both fans turn on and function properly. They should be blowing air towards the engine, not back toward the radiator. If they do not blow towards the engine, reverse the fan wiring and re-check for proper operation.
20. Verify coolant level is still correct. Because of air pockets in the system, it’s advisable to check the coolant level after every drive cycle to ensure the level is still correct.
21. Test drive the vehicle to ensure there’s no overheating, and again, verify the absence of leaks and the proper coolant level.
Enjoy the enhanced cooling and good looks of your new Mizu Radiator and Fan Shroud.

Subscribe to:
Comments (Atom)